A screened porch can be your favorite “extra room”… or it can turn into the place where the door sticks, the screen sags, and the bugs still sneak in.
Here’s the tabloid truth: most screened porch problems are not “screen problems.” They’re build problems. If the structure is weak, out of square, or not sealed right, the screens and doors will never behave.
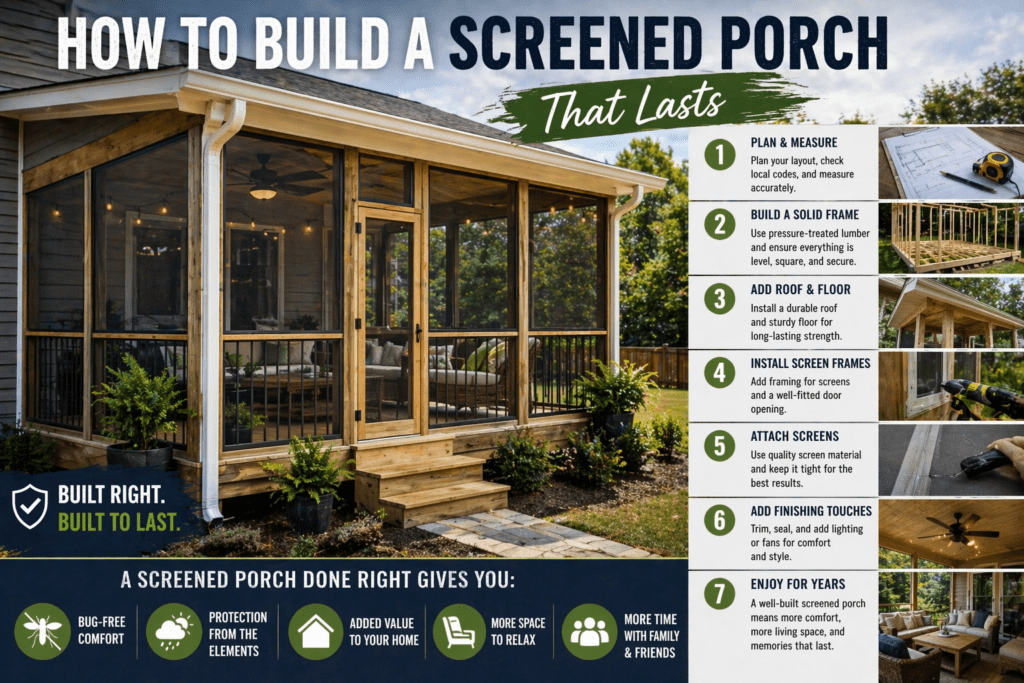
This is a homeowner-friendly guide to building a screened porch that holds up in Augusta and the CSRA.
Step 1: Decide what you’re really building
There are two common paths:
Option A: Screen in an existing covered porch
This is usually the easiest and most budget-friendly because the roof and posts are already there. Bob Vila points out that screening in is assumed to be “easy” when you already have a roof and attachment points, and costs climb when new construction is required.
Option B: Build a new porch and then screen it
This is a bigger project that can involve footings, framing, roofing tie-in work, and permits. It’s doable, but it’s not a simple weekend job.
Step 2: Start with the “square and solid” check
Before you buy a single roll of screen, check:
- are the posts plumb (straight up and down)?
- are the openings square?
- is the floor level enough that doors won’t fight you?
- is there any soft or rotted wood?
If the structure is off, fix that first. Tight screens and good doors need a stable frame.
Step 3: Plan the layout like a real room
This is where homeowners mess up the most. They build the porch, then realize:
- furniture doesn’t fit
- the door swings into the seating area
- the walkway cuts through the middle
Plan for:
- at least one clear walking lane from door to door
- a seating “zone” (rug helps)
- enough space for side tables (drinks need a home)
Step 4: Pick the right screen material for your lifestyle
The Home Depot notes fiberglass is the most common porch screen because it’s less expensive, flexible, easier to install, and doesn’t crease like metal screen.
If you have pets or heavy use, consider stronger screen options so you’re not redoing sections later.
Step 5: Build for door strength
A screened porch is only as good as the door. Build a reinforced door opening so it won’t sag over time:
- use solid framing around the door opening
- confirm the opening is square before installing the door
- plan weather stripping so gaps don’t become bug highways
Step 6: Install screens tight and clean
Screens should look smooth and stay tight. If they’re wavy on day one, they’ll be worse in six months.
- use a screen system that holds tension well
- keep corners clean and consistent
- don’t rush, tight screens take patience
Step 7: Finish edges and corners like you mean it
Trim isn’t just “for looks.” It protects edges, keeps things clean, and makes the porch feel built-in.
If you want the porch to feel like a real upgrade, this step matters.
Bottom line
To build a screened porch that lasts, focus on structure first, door framing second, and screen tension third. If those three are right, everything else is easier.
K&K Exteriors: Discover Custom Patio Covers & Screen Rooms in Augusta
Contact K&K Exteriors: Schedule Your Estimate for Exterior Improvements: Get a Screen Porch Estimate in Augusta